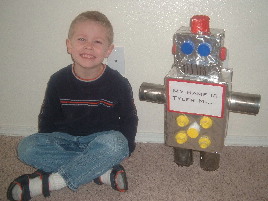
| Valentines Day is coming up and for grade school children that often means that it’s time to make a Valentine Box. With just a little extra time and creativity you can create a box that will be the envy of all your child’s classmates. Last year my son and I made a robot box. It was a lot of fun, and turned out great. |  |
The Basics
1. First stock up on supplies that can easily be transformed into something wonderful, things like: toilet paper rolls, shoe boxes, tin cans, soda bottles, tissue boxes, cereal boxes, paper towel rolls, milk jugs, yogurt cups, egg cartons, milk jug or soda lids, etc.
2. Then brainstorm different ideas of items that you could make, shapes that are rectangular/square (like shoe or cereal boxes), or cylindrical (like a soda bottle) are the easiest to transform. If you are stuck, start with the things your child is interested in or really likes and go from there.
3. Cover the basic shapes with paper. Then get some tape, glue gun, or craft glue and start sticking things together in the general shape of the object. Then add details like faces, windows, etc. with markers, buttons, felt, milk jug/soda lids, or other objects. Don’t forget to cut a small rectangle hole to put the valentines in, and someplace to get them out.
Box Ideas
· Robot – cover shoebox for the body and a pop tart box for the head, add tin cans for legs and arms, and add details with markers.
· Castle – layer cereal boxes until you have the height you want. Cover it all in tin foil; use a marker to make it look like it’s made of stone. Add towers using tin cans and top with paper cones. Add a drawbridge door out of paper and a paper moat.
· Butterfly – cover a 2-liter soda bottle with paper for the body. Then make two large paper wings and attach to tissue boxes. Glue the tissue boxes to the soda can. Add pipe stem cleaner antennae and paper eyes.
· Spider – cover a milk carton with black paper, make legs by accordion folding paper and attach to the body. Add some paper eyes.
· Boat – start with a shoebox. Cut a cereal box and fold so you create an angle on both sides and glue to the shoebox. Then attach a paper towel roll mast and a paper sail. To make sure the sail sticks out straight, glue a drinking straw to the bottom and then glue to the mast.
· Animals – start with a 2-liter soda bottle. Attach tin cans or yogurt cups for legs. The tricky part is the head use cans, boxes, or cut soda bottles, to make the basic shape, think circles and rectangles. To create the shape you want crumple paper and glue to the body or head. Then cover it all with paper and add details. Make tails out of yarn, or paper cut into strips. To make an elephant’s trunk or giraffe’s neck glue small paper cups together.

